
https://app.<your-domain>. You can sign in to it as an administrator. Everything Celum needs runs on the same VM:
- Harbor, a container registry that already holds every image and chart the onboarding wizard installs;
- Authentik, the identity provider for Celum, Harbor and Omni;
- OpenBao, a Vault-compatible secret store for cluster secrets;
- PowerDNS and CoreDNS, which serve the appliance’s own names, and zones your clusters publish into;
- Omni, Talos fleet management (on by default, licensed separately);
- the start page at
https://home.<your-domain>, which shows the appliance’s health and installs Celum updates.
Not what you are looking for? Want to run Celum’s containers on a host you already manage, against your own identity provider? Go to Quickstart. Already have the appliance running and want to add your first cluster? Go to Register a supervisor. Deploying from automation rather than the wizard? Every field below is also a key in Appliance configuration.
What this changes in your environment
The wizard creates one VM. The appliance changes nothing else in vCenter. It contacts none of your clusters until you register one. There is one exception. In theacme-dns01 certificate mode, the appliance uses the DNS provider credentials you supply to create TXT records in your zone. That is how it proves to Let’s Encrypt that you own the domain.
Before you start
- vCenter with ESXi 7.0 or later. The appliance uses virtual hardware version 17 and EFI firmware.
- Capacity for 8 vCPU, 16 GB RAM and a 120 GB thin disk. These are not padding. Harbor alone asks for 8 GB, and the VM also runs Authentik, PostgreSQL, OpenBao, PowerDNS, Omni and Celum. You can enlarge the disk in vSphere before the first power-on, and the appliance grows its filesystem to fill it.
- A port group the VM can join, with a free static address. DHCP works for a trial, but Omni requires a fixed address.
- A DNS domain for the appliance, such as
celum.example.com. The appliance serves several names under it. See step 3. - An SSH public key. The appliance accepts only key logins over SSH, and it reads the wizard’s answers only on the first boot. Without a key you cannot open a shell to troubleshoot or change the configuration.
- A certificate decision. See the next section.
Choose a certificate mode
The mode decides what else you need, so pick it now.Fields that carry a file take its base64. The wizard’s fields are one line, so a certificate or key pasted as it is loses its line breaks. The appliance refuses a raw PEM at first boot. Encode the file first:
- Linux:
base64 -w0 chain.pem - macOS:
base64 -i chain.pem - PowerShell:
[Convert]::ToBase64String([IO.File]::ReadAllBytes((Resolve-Path chain.pem)))
Network access
The shape of it
Import → answer → resolve → power on → sign in → activate. Step 2 is the only one with decisions in it.Step 1 — Import the OVA
- Content Library
- vSphere Client
- govc
Use a Content Library to deploy the same release more than once, or from several vCenters.
- In Content Libraries, open or create a library and choose Import item. Select the
celum-appliance-<version>.ovafile or URL. - Once the import finishes, right-click the item and choose New VM from This Template.
- Name the VM and pick a folder, then a compute resource.
- Accept the details page. If vCenter warns about advanced configuration options, that is expected: the OVA sets EFI firmware and time sync with the host.
- Storage: choose a datastore. Thin Provision is fine.
- Networks: map the source network
VM Networkto your port group. - You arrive at Customize template. Continue with step 2.
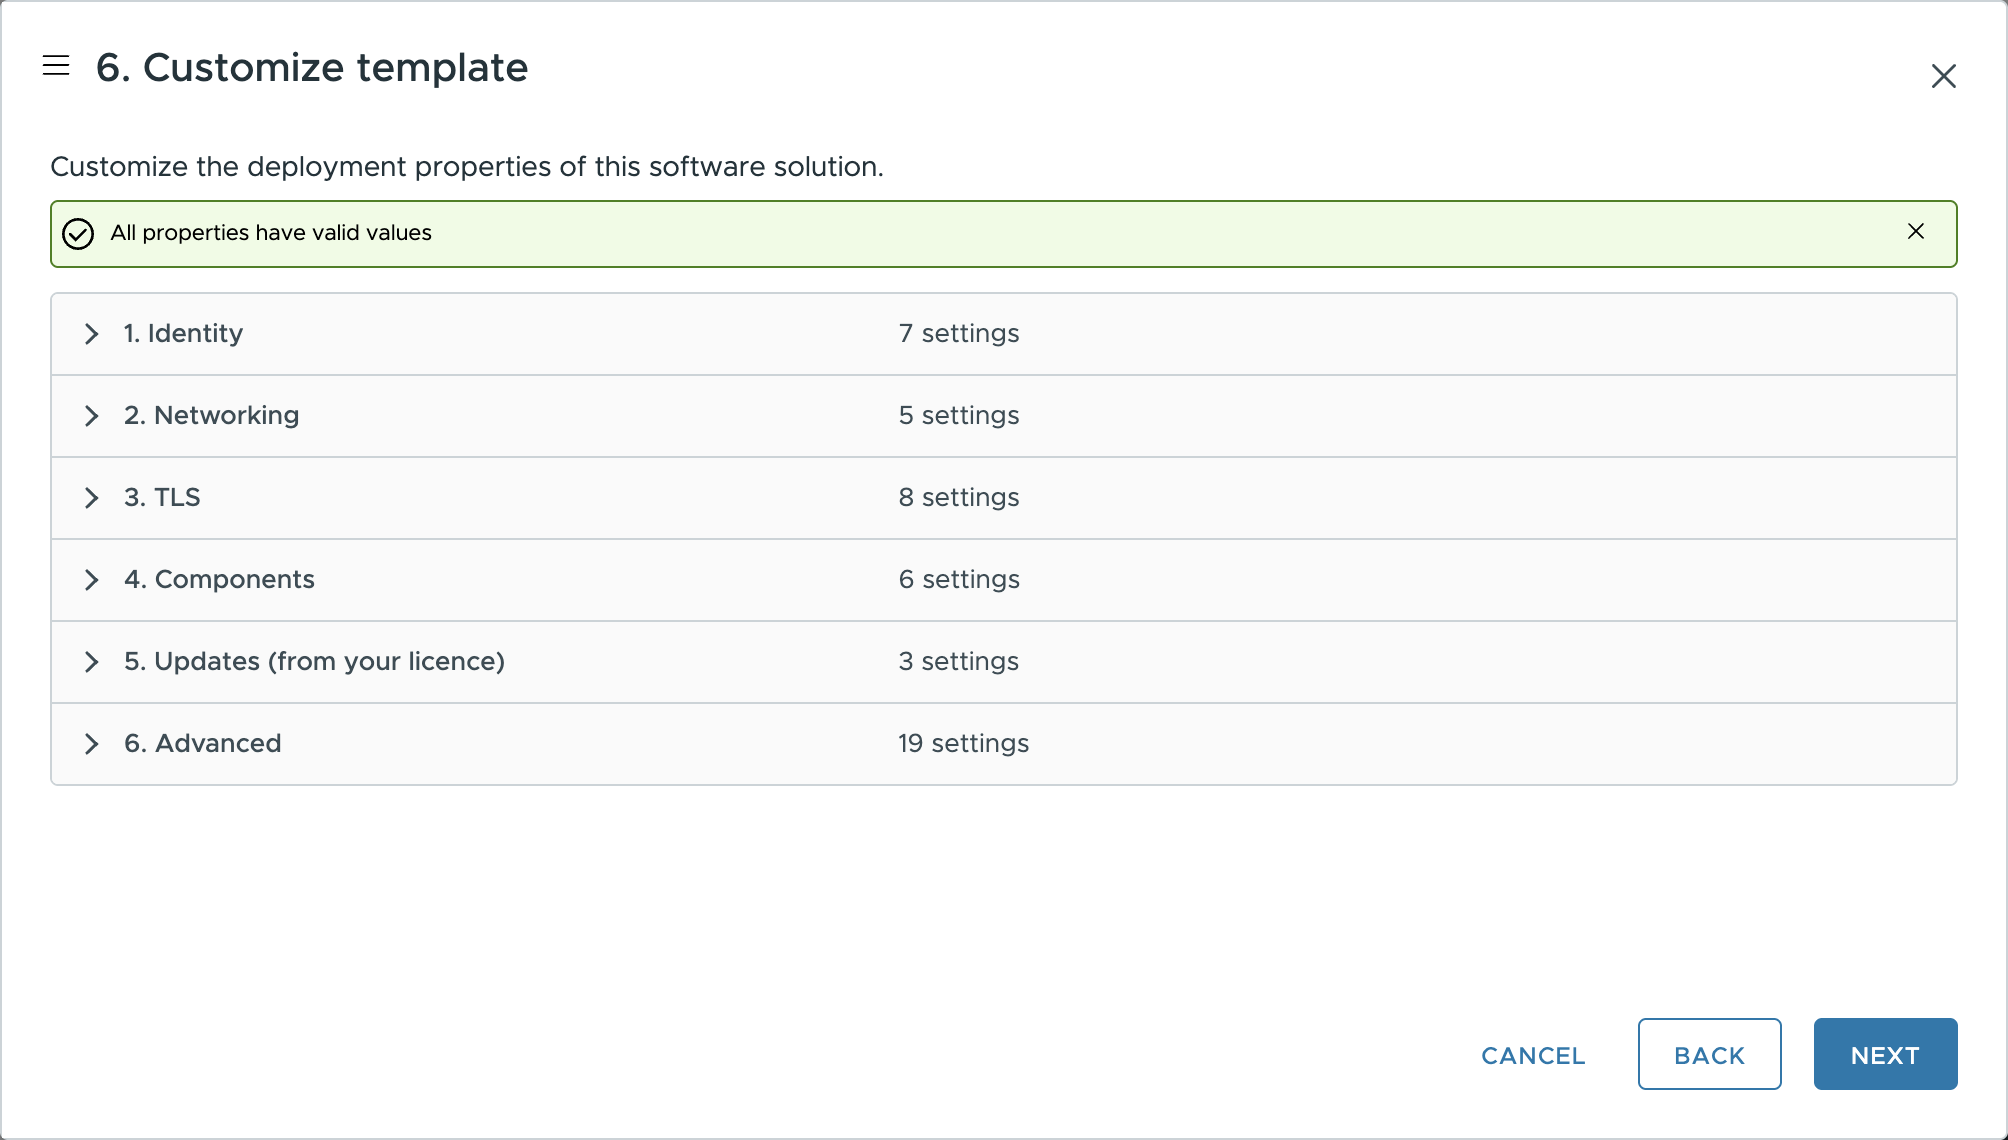
Customize template, with the two required fields filled in
Step 2 — Answer the deploy wizard
Two fields are required, and both are marked*. Every other field is optional and has a default that works.
1. Identity
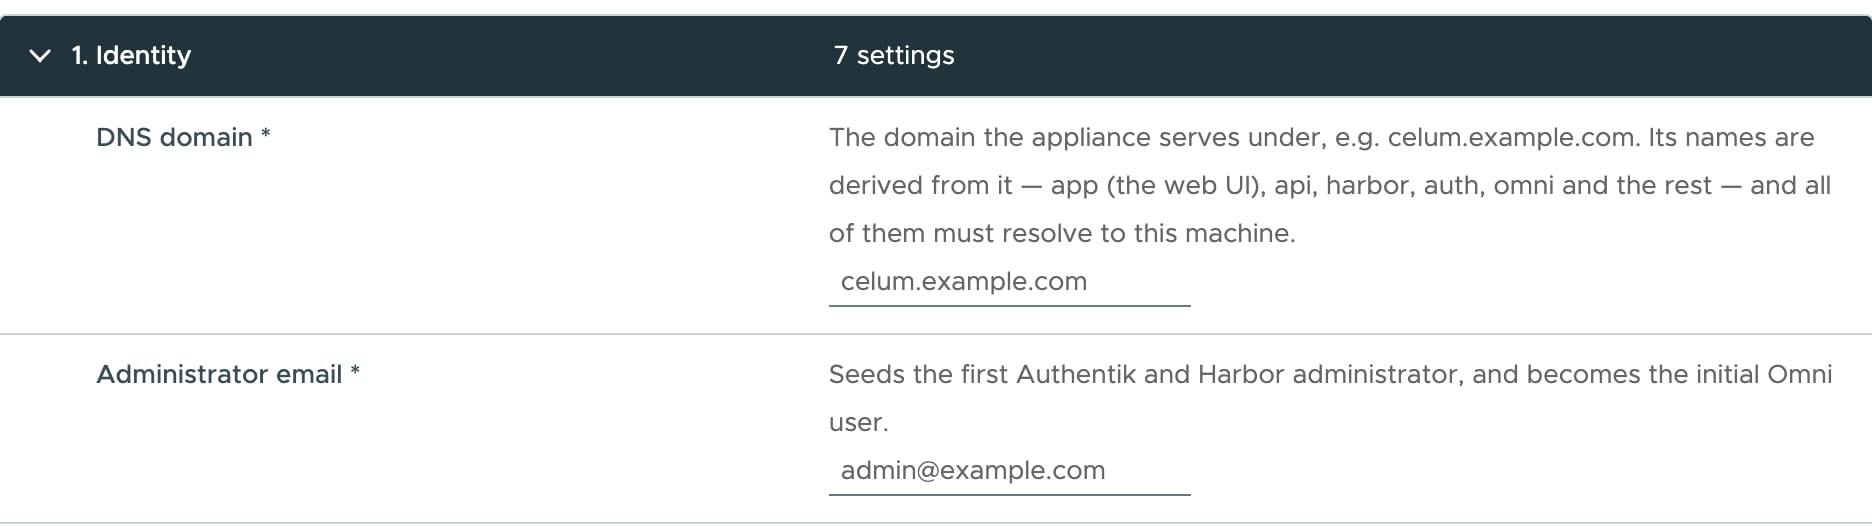
Identity: only the domain and the administrator email are required
2. Networking
Leave the address and the gateway blank to use DHCP. For a static address, fill in: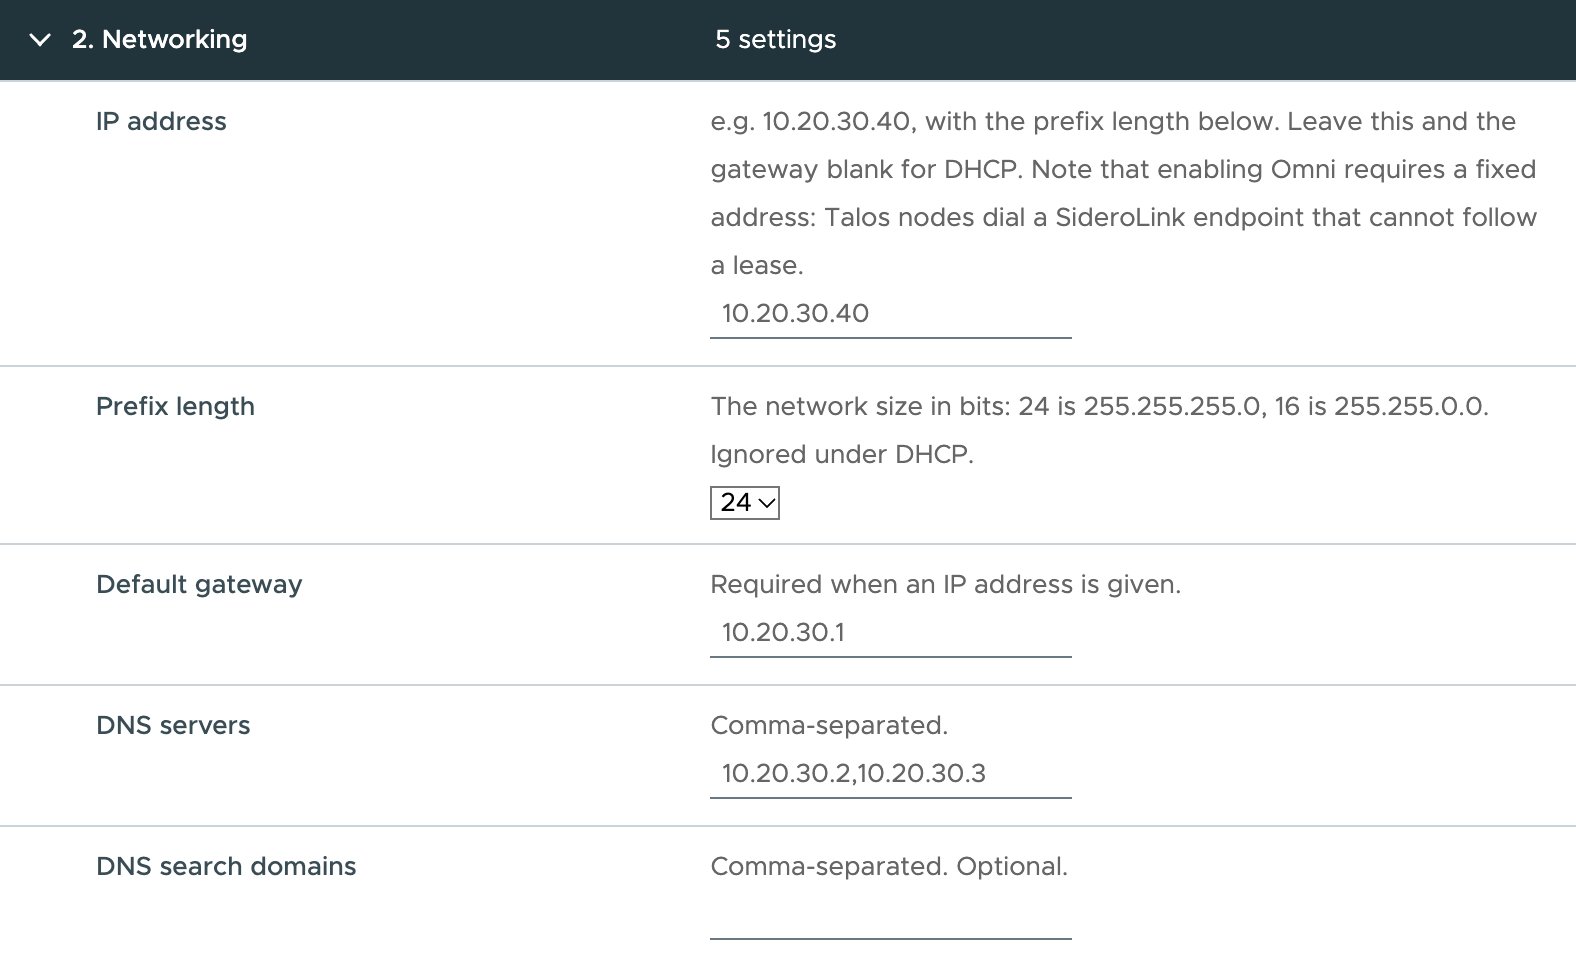
Networking with a static address
3. TLS
4. Components
5. Updates
6. Advanced
Change these only when you have a reason to.
Result: you can finish the wizard. Do not power the VM on yet.
Step 3 — Make the names resolve
The appliance serves these names, each on its own address:
Pick one way to make them resolve:
- Delegate the domain to the appliance (DNS on). Add an
NSrecord for<domain>in the parent zone, pointing at a name for the appliance, with a glueArecord for its address. The appliance answers for every name in the table. - Point clients at the appliance (DNS on). A client whose resolver is the appliance’s address resolves every name with no other DNS.
- Create the records yourself. A single wildcard record,
*.<domain>, pointing at the appliance covers all of them.
app. to auth. and back through api.. If any one of those names does not resolve, the sign-in fails partway through.
Result: from your workstation, every name in the table that applies to you resolves to the appliance’s address.
Step 4 — Power on and watch the first boot
Power on the VM and open its console. vCenter delivers your wizard answers to the VM at power-on. The appliance writes them to/etc/celum-appliance/appliance.yaml, then configures and starts each component in order, logging its progress to the console.
The first boot takes a while: the appliance loads every bundled image and chart into Harbor. When it finishes, the console prints a summary like this:
/root/celum-appliance-credentials.txt, readable only by root. The start page at https://home.<domain> shows the same health and addresses once you sign in to it.
To follow the progress over SSH instead of the console:
celum-appliance status lists every stage as done, and the console shows the summary.
Step 5 — Sign in
- Open
https://app.<domain>. - You are redirected to
https://auth.<domain>. Sign in with the administrator email and the Authentik password from the summary. - You land back in Celum.
selfsigned without your own signing CA, your browser warns on each name. To stop the warnings, copy /etc/celum-appliance/tls/ca.crt from the appliance and add it to your workstation’s trusted roots. A redeploy mints a new CA.
Result: Celum opens on Welcome to Celum, because you have not registered a cluster yet.
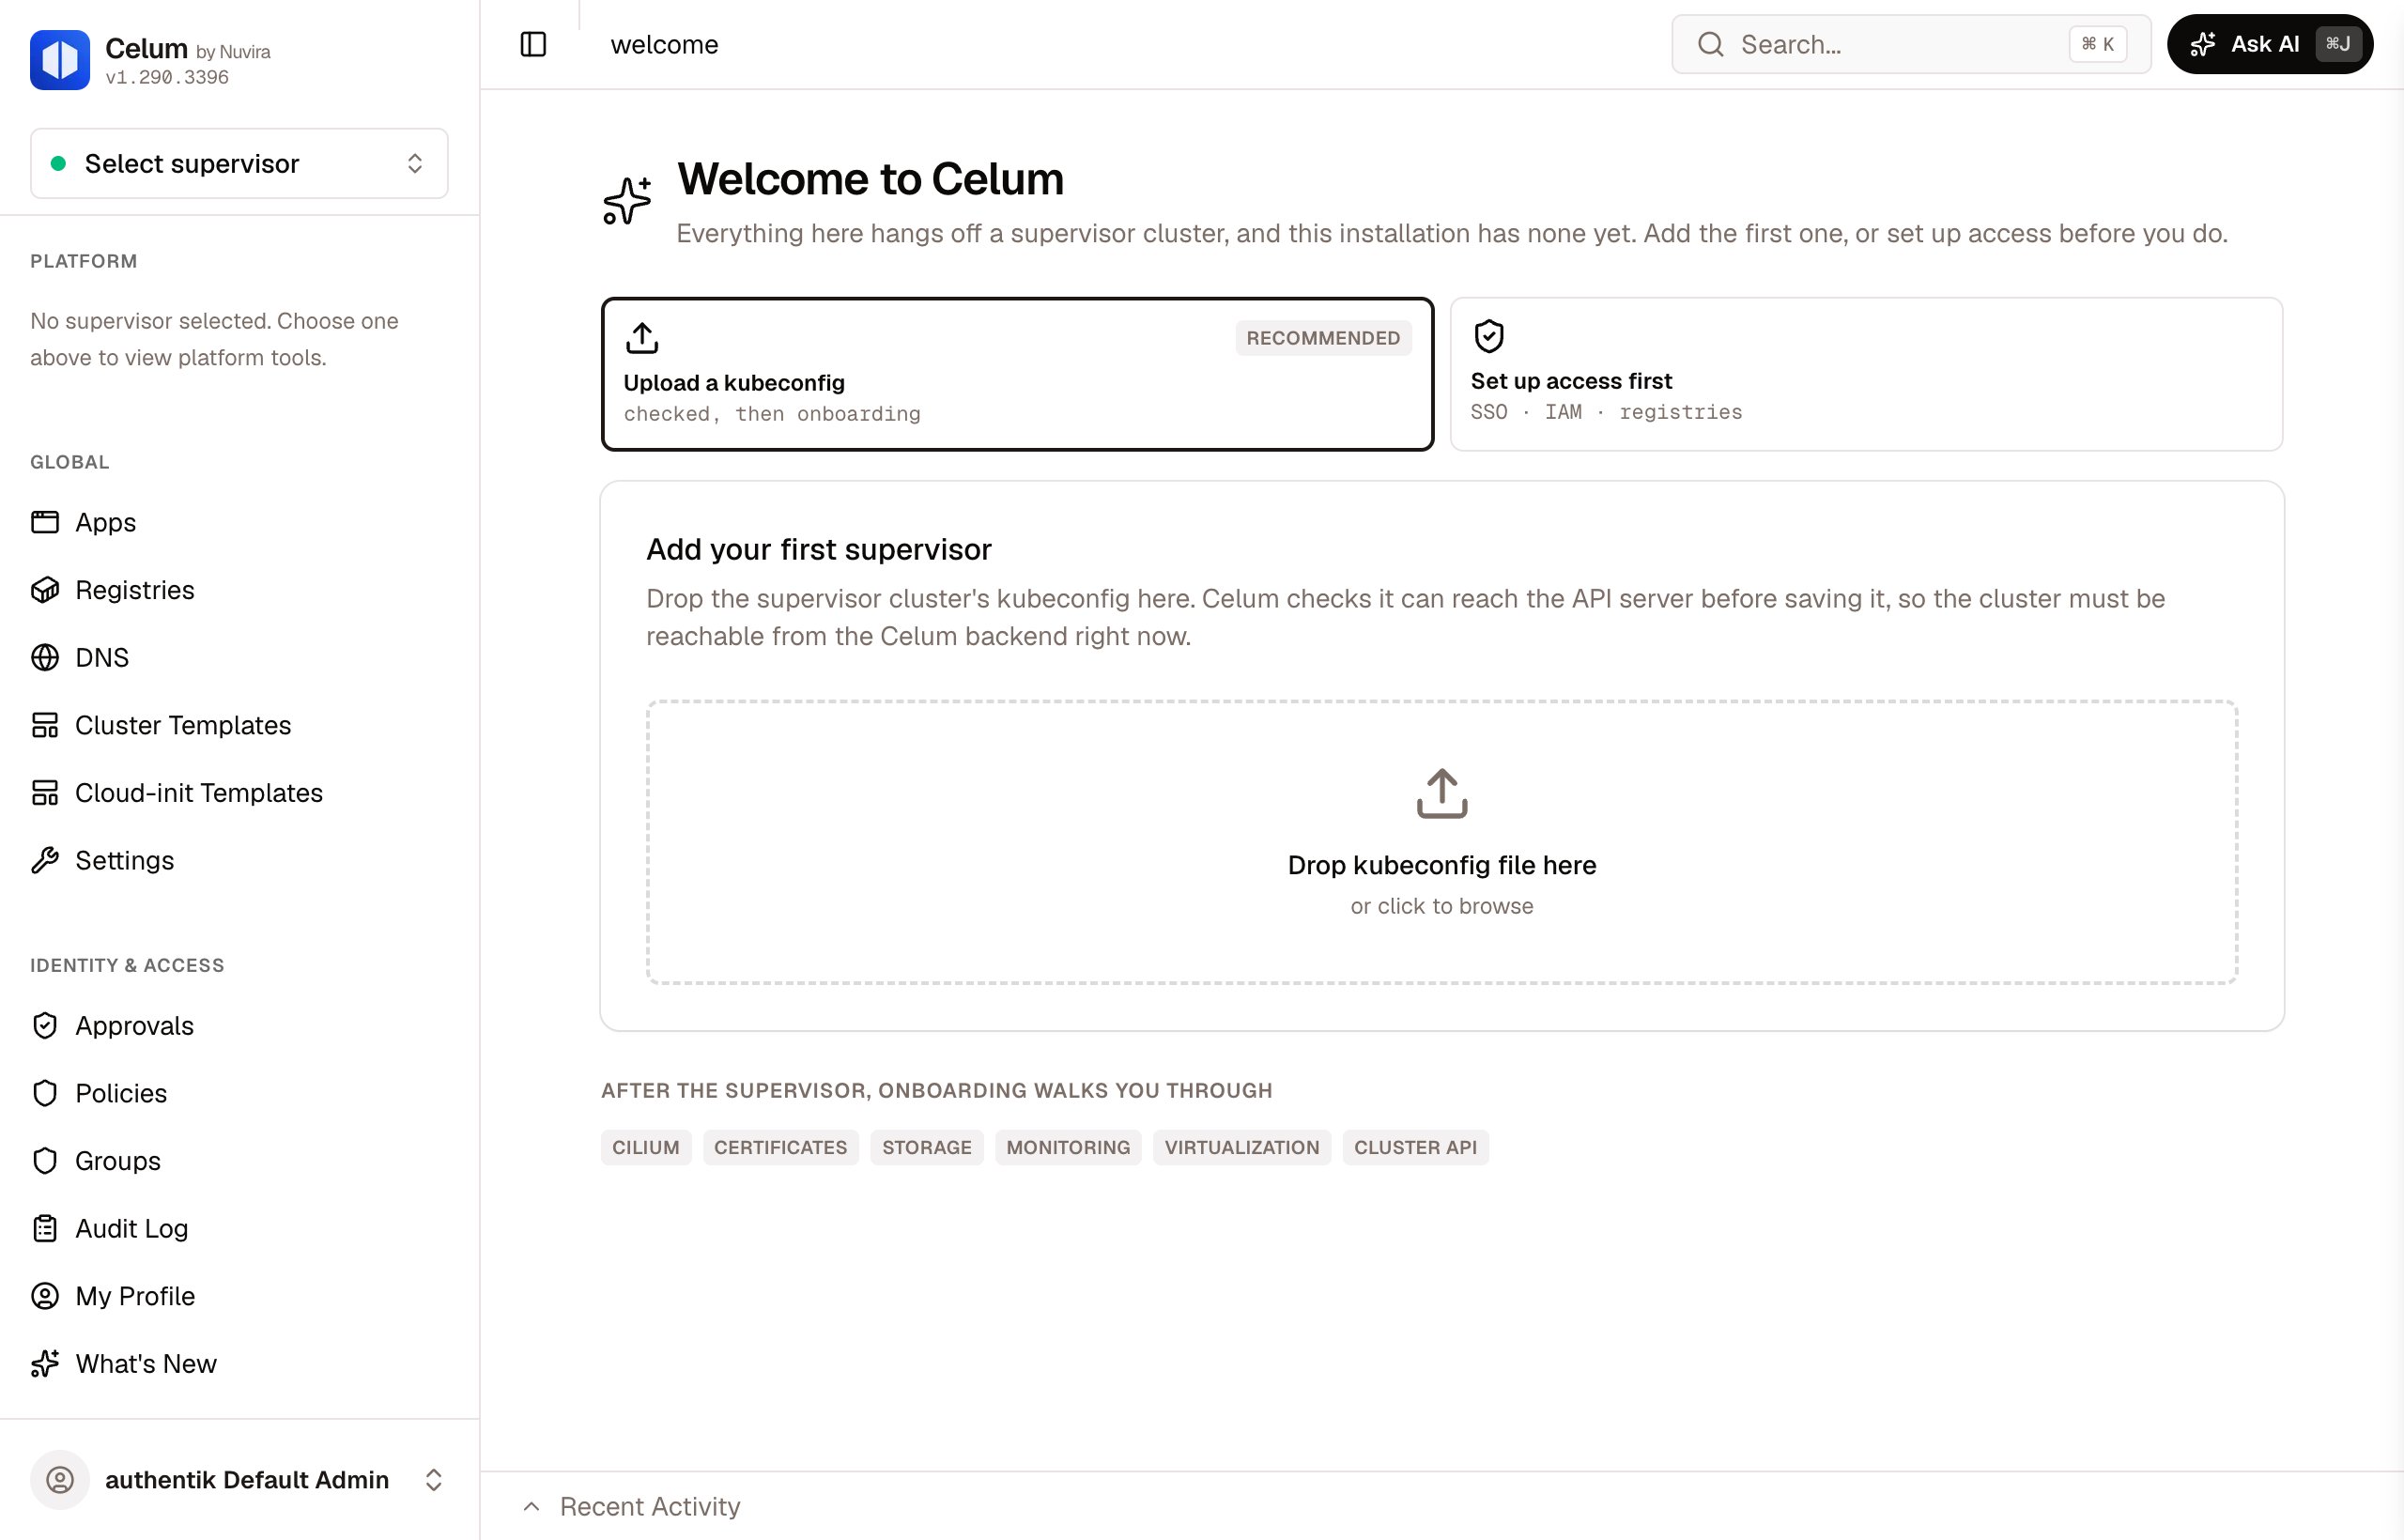
The first page of a new installation
https://app.<domain>/iam/me. Your identity-provider groups include celum-admins (or the group name you chose), and it is matched to the IAM group Administrators.
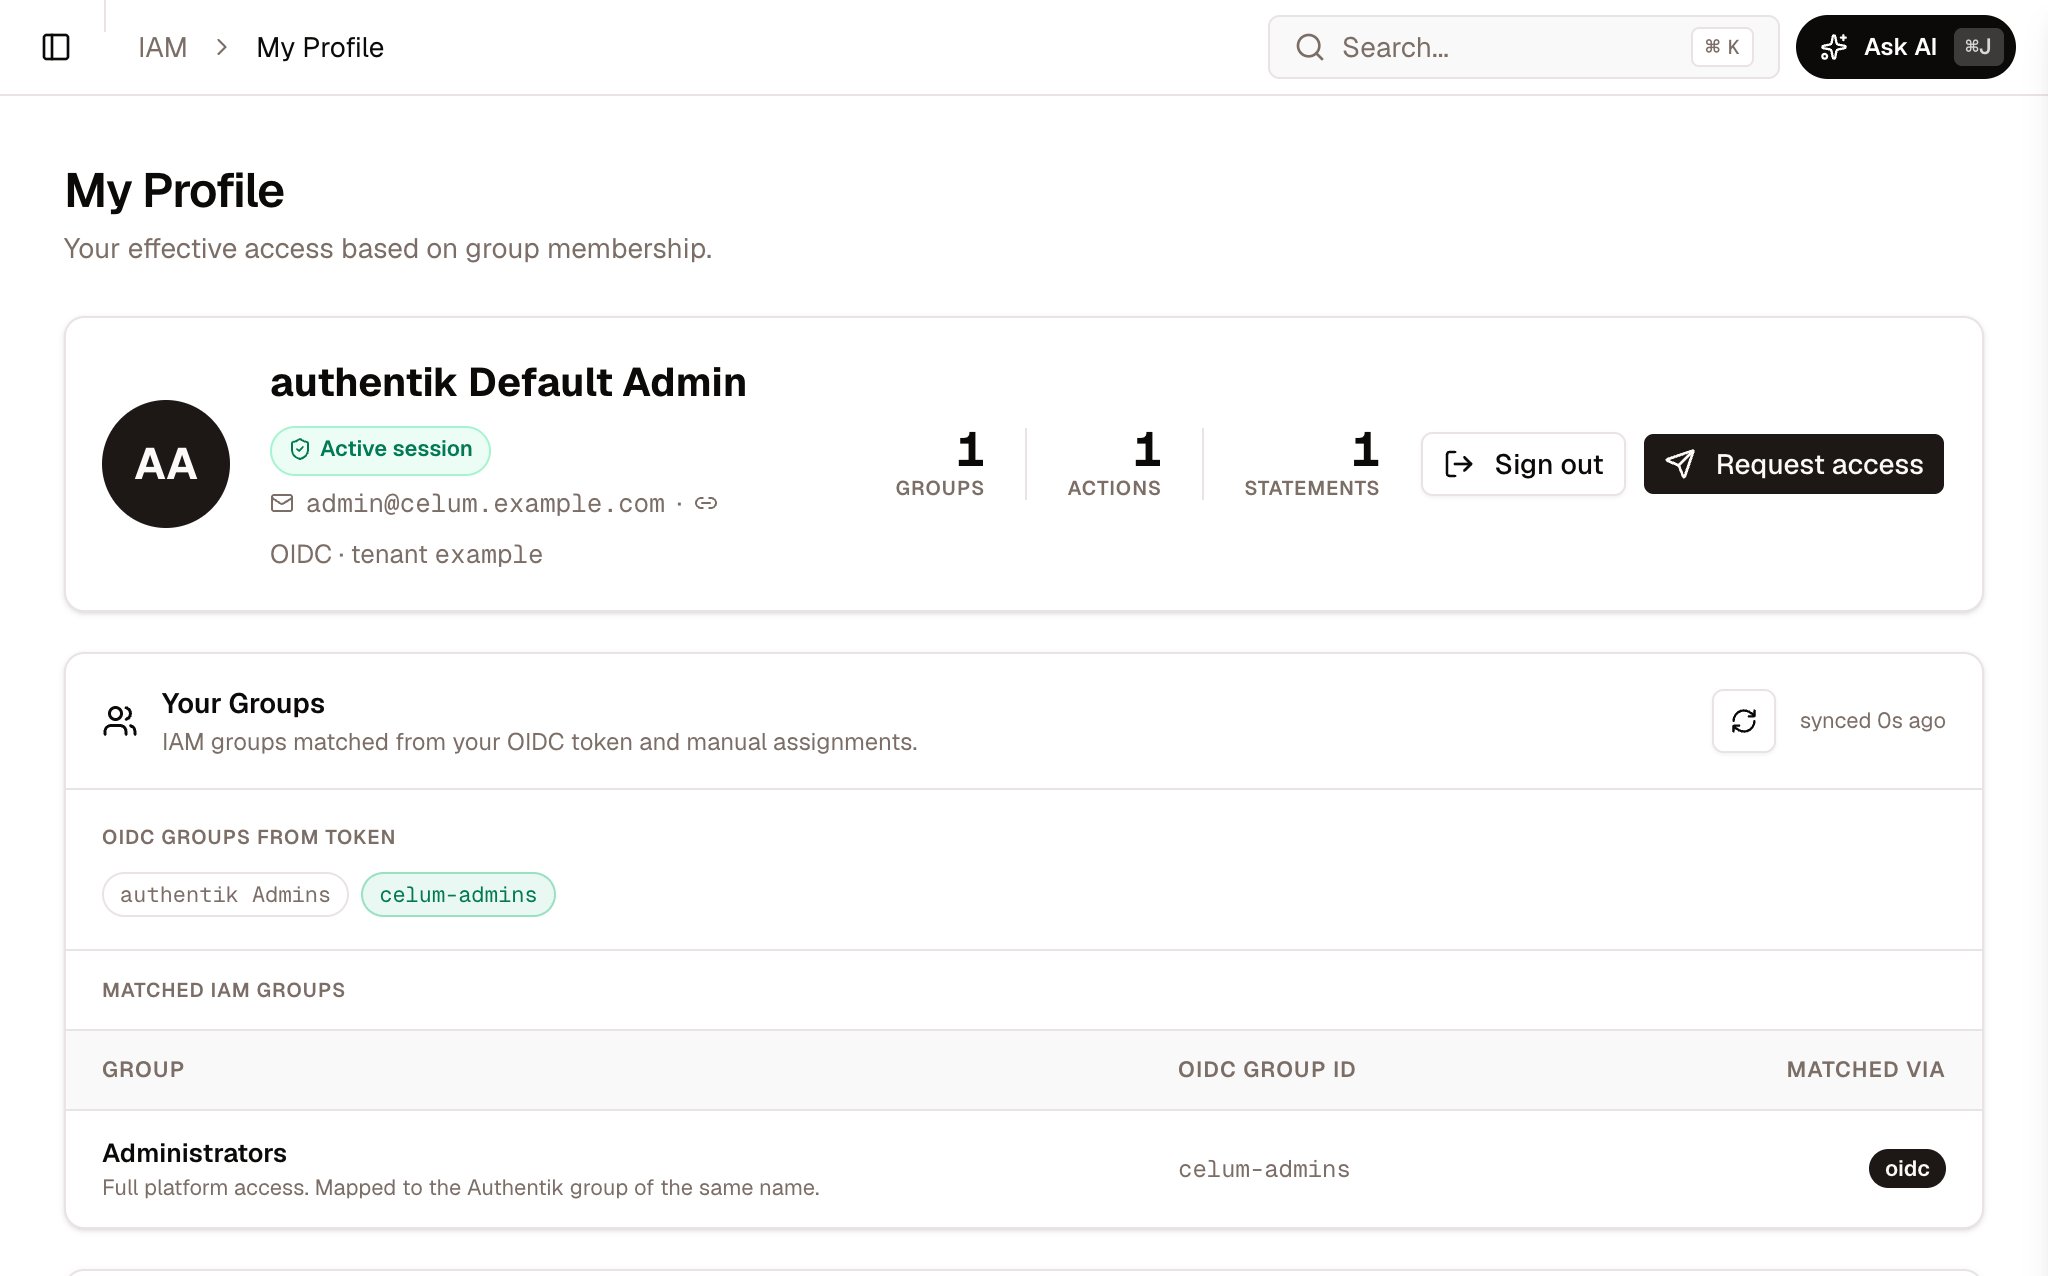
My Profile: celum-admins from the token, matched to Administrators
Step 6 — Activate Celum
Celum is fully usable for 30 days from its first start. A banner counts them down. After that, Celum needs a licence to make changes. Without one it is read-only:- you can still see everything;
- every change answers
402“Celum is not activated”; - the appliance keeps running its bootstrap, backups and certificate renewals.
- Send the installation ID to Nuvira. Under Settings → Licence, copy the Installation ID. Or choose Download activation request and send that file: it names the installation ID, the Celum version and the appliance’s clock.
- Nuvira sends you back a licence, a
.celum-licensefile. - Under Settings → Licence, choose Upload licence file or Paste licence. Celum checks the licence against this installation before it stores it.
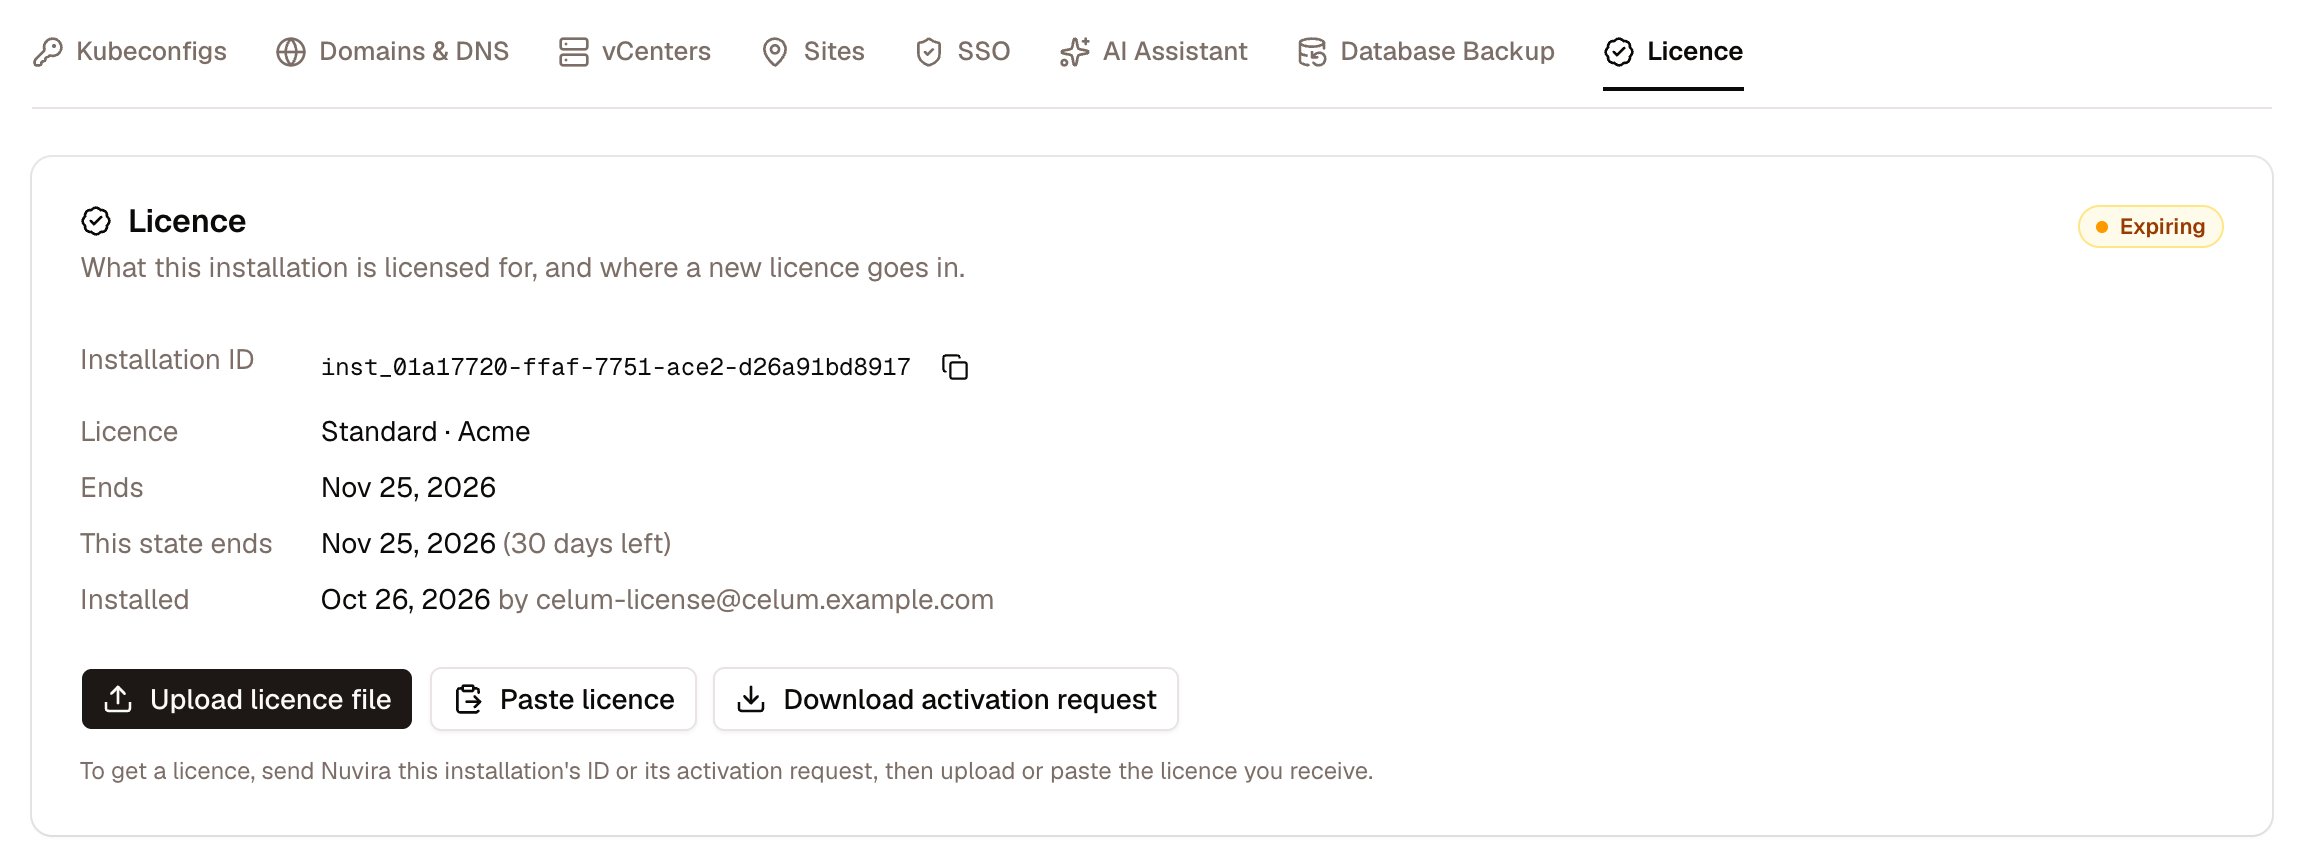
Settings → Licence: the installation ID to send, and the three actions
- UI
- Console
- API
- MCP
Settings → Licence shows the installation ID, the licence and when it ends. It also has Upload licence file, Paste licence and Download activation request.
license:Update on krn:celum:license:global, which the Administrators group holds.
Result: Settings → Licence shows your licence and its end date, and the countdown banner is gone.
What happens next:
- Nothing phones home. Celum checks the licence on the appliance, against keys built into it, so an air-gapped appliance activates the same way.
- Before the licence ends, a banner warns you, 30 days ahead. After a paid licence ends, Celum keeps working for 14 days of grace. A trial licence has no grace. Then Celum is read-only until you install a new licence.
- Setting the clock back does not help. Celum judges the licence at the latest time it has already seen.
- Restoring Celum’s database needs no licence. Settings → Database Backup → Import stays open while Celum is read-only. A replacement appliance restored from its predecessor’s backup gets the predecessor’s installation ID and licence back, so it needs no new licence.
Verify
https://app.<domain>signs you in through Authentik, without a certificate warning (or with one you expected underselfsigned).https://home.<domain>signs you in with the start page account and shows every application as running.https://harbor.<domain>shows thecelumproject already filled with images and charts. That content came from inside the OVA, so this proves the bundled images loaded.- In Celum, Registries lists
appliance-harboras the default registry for charts and images. - Settings → Licence shows your licence and when it ends.
If you need to undo it
Power off and delete the VM. That is all of it: the appliance created nothing outside itself, apart from DNS records you added and, underacme-dns01, TXT records that exist only while a certificate is being issued.
Once you register clusters and onboard them, they pull images from this appliance’s Harbor. Deleting the appliance after that point leaves them unable to pull. Move them to another registry first.
What commonly goes wrong
To see the configuration the appliance is actually using, and any warnings about it, run
celum-appliance config over SSH.